REST API
On this chapter we are going to describe how you can define a RESTful API using almost the same concept as defining your MVC views.
- note:
Follow this example on Flask-AppBuilder project ./examples/base_api/
First let’s see a basic example on how you can define your own custom API endpoints:
from flask_appbuilder.api import BaseApi, expose
from . import appbuilder


class ExampleApi(BaseApi):
    @expose('/greeting')
    def greeting(self):
        return self.response(200, message="Hello")


appbuilder.add_api(ExampleApi)
On the previous example, we are exposing an HTTP GET endpoint, that returns the following JSON payload:
{
    "message": "Hello"
}
The @expose decorator registers your class method as a Flask route that is going
to be associated with a Flask blueprint. A BaseApi class defines a blueprint that
contains all exposed methods. By default the base route of the class blueprint is
defined by:
/api/v1/<LOWERCASE_CLASS_NAME>
So we can make a request to our method using:
$ curl http://localhost:8080/api/v1/exampleapi/greeting
To override the base route class blueprint, override the route_base property,
so on our previous example:
from flask_appbuilder.api import BaseApi, expose
from . import appbuilder


class ExampleApi(BaseApi):

    route_base = '/newapi/v2/nice'

    @expose('/greeting')
    def greeting(self):
        return self.response(200, message="Hello")


appbuilder.add_api(ExampleApi)
Now our endpoint will be:
$ curl http://localhost:8080/newapi/v2/nice/greeting
We can also just override the version and/or resource name,
using version and resource_name properties:
from flask_appbuilder.api import BaseApi, expose
from . import appbuilder


class ExampleApi(BaseApi):

    resource_name = 'example'

    @expose('/greeting')
    def greeting(self):
        return self.response(200, message="Hello")


appbuilder.add_api(ExampleApi)
Now our endpoint will be:
$ curl http://localhost:8080/api/v1/example/greeting
The other HTTP methods (PUT, POST, DELETE, …) can be defined just like a Flask route signature:
from flask import request
from flask_appbuilder.api import BaseApi, expose

class ExampleApi(BaseApi):

    ....

    @expose('/greeting2', methods=['POST', 'GET'])
    def greeting2(self):
        if request.method == 'GET':
            return self.response(200, message="Hello (GET)")
        return self.response(201, message="Hello (POST)")
The previous example will expose a new greeting2 endpoint on HTTP GET and POST so we can request it by:
$ curl http://localhost:8080/api/v1/example/greeting2
{
    "message": "Hello (GET)"
}
$ curl -XPOST http://localhost:8080/api/v1/example/greeting2
{
    "message": "Hello (POST)"
}
Let’s make our method a bit more interesting, and send our name on the HTTP
GET method. You can optionally use a @rison decorator that will parse
the HTTP URI arguments from a Rison structure to a python data structure.
On this example it may seem a bit overboard but with Rison we can handle
complex HTTP GET arguments in a human readable and predictable way.
Rison is a slight variation of JSON that looks vastly superior after URI encoding.
Rison still expresses exactly the same set of data structures as JSON,
so data can be translated back and forth without loss or guesswork:
from flask_appbuilder.api import BaseApi, expose, rison

class ExampleApi(BaseApi):

    ...

    @expose('/greeting3')
    @rison()
    def greeting3(self, **kwargs):
        if 'name' in kwargs['rison']:
            return self.response(
                200,
                message=f"Hello {kwargs['rison']['name']}"
            )
        return self.response_400(message="Please send your name")
And to test our method:
$ curl 'http://localhost:8080/api/v1/example/greeting3?q=(name:daniel)'
{
    "message": "Hello daniel"
}
To test this concept let’s create a new method where we send a somewhat complex data structure that will use numbers, booleans and lists, and send it back JSON formatted. First our data structure, let’s first think JSON:
{
    "bool": true,
    "list": ["a", "b", "c"],
    "number": 777,
    "string": "string"
    "null": null
}
On Rison format:
(bool:!t,list:!(a,b,c),null:!n,number:777,string:'string')
Behind the scenes FAB is using prison a very nicely done fork developed by @betodealmeida We can use this package, to help us dump or load python structures to Rison:
import prison
b = {
    "bool": True,
    "list": ["a", "b", "c"],
    "number": 777,
    "string": "string",
    "null": None
}

print(prison.dumps(b))
So to test our concept:
...

@expose('/risonjson')
@rison()
def rison_json(self, **kwargs):
    return self.response(200, result=kwargs['rison'])
Then call it:
$ curl 'http://localhost:8080/api/v1/example/risonjson?q=(bool:!t,list:!(a,b,c),null:!n,number:777,string:'string')'
{
  "result": {
    "bool": true,
    "list": [
      "a",
      "b",
      "c"
    ],
    "null": null,
    "number": 777,
    "string": "string"
  }
}
Notice how the data types are preserved. Remember that we are building a Flask app
so you can always use normal URI arguments using Flask’s request.args
If we send an invalid Rison argument we get an error:
$ curl -v 'http://localhost:8080/api/v1/example/risonjson?q=(bool:!t'
...
< HTTP/1.0 400 BAD REQUEST
< Content-Type: application/json; charset=utf-8
...
{
  "message": "Not a valid rison argument"
}
You can additionally pass a JSON schema to validate your Rison arguments, this way you can implement a very strict API easily:
schema = {
    "type": "object",
    "properties": {
        "name": {
            "type": "string"
        }
    }
}
...

@expose('/greeting4')
@rison(schema)
def greeting4(self, **kwargs):
    return self.response(
        200,
        message=f"Hello {kwargs['rison']['name']}"
    )
Finally to properly handle all possible exceptions use the safe decorator,
that will catch all uncaught exceptions for you and return a proper error response.
You can enable or disable stack trace response using the
FAB_API_SHOW_STACKTRACE configuration key:
from flask_appbuilder.api import BaseApi, expose, rison, safe

...

@expose('/error')
@safe
def error(self):
    raise Exception
OpenAPI spec
We can define an OpenAPI specification by using YAML on the docs section of our methods:
@expose('/greeting')
def greeting(self):
    """Send a greeting
    ---
    get:
      responses:
        200:
          description: Greet the user
          content:
            application/json:
              schema:
                type: object
                properties:
                  message:
                    type: string
    """
    return self.response(200, message="Hello")
We are defining that, our endpoint will respond to HTTP GET with a JSON object that contains
a key message with values of type string. To access all our OpenAPI specifications
request it on /api/v1/_openapi, this is a dynamic endpoint that will serve all specs
from different API versions. So if we register an API for version v2 we access it’s
spec on /api/v2/_openapi. Please note that OpenAPI specs are subject to authentication.
So our spec for a method that accepts two HTTP verbs:
@expose('/greeting2', methods=['POST', 'GET'])
def greeting2(self):
    """Send a greeting
    ---
    get:
      responses:
        200:
          description: Greet the user
          content:
            application/json:
              schema:
                type: object
                properties:
                  message:
                    type: string
    post:
      responses:
        201:
          description: Greet the user
          content:
            application/json:
              schema:
                type: object
                properties:
                  message:
                    type: string
    """
    if request.method == 'GET':
        return self.response(200, message="Hello (GET)")
    return self.response(201, message="Hello (POST)")
To access Swagger UI you must enable FAB_API_SWAGGER_UI = True on your config file
then goto http://localhost:8080/swagger/v1 for OpenAPI v1 definitions
On Swagger UI our example API looks like:
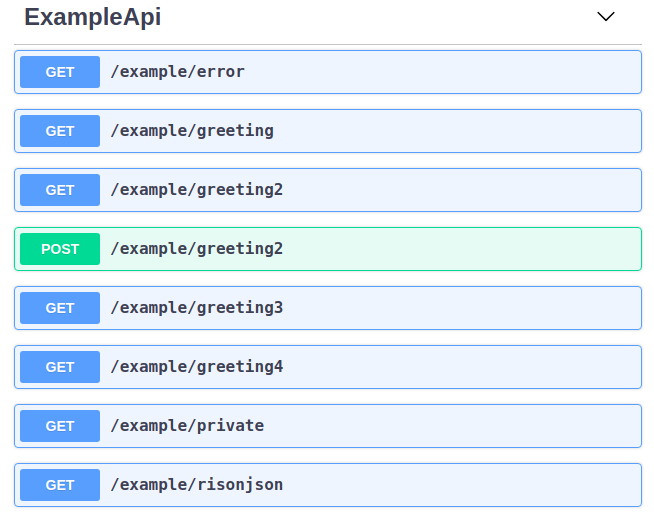
Notice the get and put structures, we should always detail all our
possible responses. The BaseApi class comes with some pre packaged HTTP
responses we can use for the sake of brevity:
@expose('/error')
@protect()
@safe
def error(self):
    """Error 500
    ---
    get:
      responses:
        500:
          $ref: '#/components/responses/500'
    """
    raise Exception
A complete list of packaged responses you can use:
responses:
  400:
    $ref: '#/components/responses/400'
  401:
    $ref: '#/components/responses/401'
  404:
    $ref: '#/components/responses/404'
  422:
    $ref: '#/components/responses/422'
  500:
    $ref: '#/components/responses/500'
The automatic OpenAPI spec generation also supports Rison arguments and their
json schema spec. Since both are compatible we can reuse our Json schema spec on OpenAPI.
First we need to register our spec, using apispec_parameter_schemas dictionary:
class ExampleApi(BaseApi):

    resource_name = 'example'
    apispec_parameter_schemas = {
        "greeting_schema": greeting_schema
    }
FAB will register your schema on /components/parameters, so you can now
easily reference them:
@expose('/greeting4')
@rison(greeting_schema)
def greeting4(self, **kwargs):
    """Get item from Model
    ---
    get:
      parameters:
      - $ref: '#/components/parameters/greeting_schema'
      responses:
        200:
          description: Greet the user
          content:
            application/json:
              schema:
                type: object
                properties:
                  message:
                    type: string
    """
    return self.response(
        200,
        message=f"Hello {kwargs['rison']['name']}"
    )
Security
FAB offers user management, several authentication backends and granular role base access so we can use these features on the API also. Default API authentication method is done using JSON Web Tokens (JWT).
- tip:
FAB’s JWT authentication is done with flask-jwt-extended. Checkout it’s documentation for custom configuration: https://flask-jwt-extended.readthedocs.io/en/latest/options.html
Next, let’s see how to create a private method:
from flask import request
from flask_appbuilder.api import BaseApi, expose, rison
from flask_appbuilder.security.decorators import protect
from . import appbuilder


class ExampleApi(BaseApi):

    ...
    @expose('/private')
    @protect()
    def rison_json(self):
        """Say it's risonjson
        ---
        get:
          responses:
            200:
              description: Say it's private
              content:
                application/json:
                  schema:
                    type: object
            401:
              $ref: '#/components/responses/401'
        """
        return self.response(200, message="This is private")


appbuilder.add_api(ExampleApi)
Accessing this method as expected will return an HTTP 401 not authorized code and message:
$ curl -v 'http://localhost:8080/api/v1/example/private'
...
< HTTP/1.0 401 UNAUTHORIZED
< Content-Type: application/json
...
{
    "msg": "Missing Authorization Header"
}
So we need to first obtain our JSON Web token, for this, FAB registers a login endpoint. For this we POST request with a JSON payload using:
{
    "username": "<USERNAME>",
    "password": "<PASSWORD>",
    "provider": "db|ldap"
}
Notice the provider argument, FAB currently supports DB and LDAP
authentication backends for the Api. The login endpoint returns a fresh access token and optionally
a refresh token. You can renew the access token using the refresh token but this time
the returned token will not be fresh. To obtain a new non fresh access token
use refresh endpoint with the refresh token. To obtain a refresh token on the login endpoint
send the optional parameter “refresh”: true on the JSON PUT payload.
Let’s request our Token then:
# If not already, create an admin user
$ export FLASK_APP=app
$ flask fab create-admin
Username [admin]:
User first name [admin]:
User last name [user]:
Email [admin@fab.org]:
Password:
Repeat for confirmation:
...
Admin User admin created.

# Login to obtain a token
$ curl -XPOST http://localhost:8080/api/v1/security/login -d \
  '{"username": "admin", "password": "password", "provider": "db"}' \
  -H "Content-Type: application/json"
{
    "access_token": "<SOME TOKEN>"
}
# It's nice to use the Token as an env var
$ export TOKEN="<SOME TOKEN>"
Next we can use our token on protected endpoints:
$ curl 'http://localhost:8080/api/v1/example/private' -H "Authorization: Bearer $TOKEN"
{
    "message": "This is private"
}
As always FAB created a new can_private permission on the DB named “can private on ExampleApi” Note that you can protect all your methods and make them public or not by adding them to the Public Role.
Also to restrict the default permissions we can use base_permissions
list property. This can be specially useful on ModelRestApi (up next)
where we can restrict our Api resources to be read only, or only allow POST
methods:
class ExampleApi(BaseApi):
    base_permissions = ['can_private']
You can create an alternate JWT user loader, this can be useful if you want to use an external Authentication provider and map the JWT identity to your user Model:
@appbuilder.sm.jwt_manager.user_loader_callback_loader
def alternate_user_loader(identity):
    # find the user by it's identity
    ...
    return user
Optionally you can enable signed cookie sessions (from flask-login) on the API. You can do it class or method wide:
class ExampleApi(BaseApi):
    allow_browser_login = True
The previous example will enable cookie sessions on the all class:
class ExampleApi(BaseApi):

    @expose('/private')
    @protect(allow_browser_login=True)
    def private(self)
        ....
On the previous example, we are enabling signed cookies on the private method. Note that even then
a valid JWT is also accepted.
Model REST API
To automatically create a RESTfull CRUD Api from a database Model, use ModelRestApi class and
define it almost like an MVC ModelView. This class will expose the following REST endpoints
- note:
Follow this example on Flask-AppBuilder project ./examples/crud_rest_api/
URL |
Description |
Permission Name |
HTTP |
|---|---|---|---|
/_info |
Returns info about the CRUD model and security |
can_info |
GET |
/ |
Queries models data, receives args as Rison |
can_get |
GET |
/<PK> |
Returns a single model from it’s primary key (id) |
can_get |
GET |
/ |
Receives a JSON payload as POST and creates record |
can_post |
POST |
/ |
Receives a JSON payload as PUT and updates record |
can_put |
PUT |
/<PK> |
Deletes a single model from it’s primary key (id) |
can_delete |
DELETE |
For each ModelRestApi you will get 5 CRUD endpoints and an extra information method.
All created CRUD endpoints have their OpenAPI spec accessible on /api/<version>/_openapi,
each class is tagged so the CRUD endpoints get nicely grouped when using Swagger UI.
Notice that ModelRestApi will generate a complete OpenAPI schema models for you data,
so you can get free documentation for you API’s.
FAB will create all possible permissions and add them to the AUTH_ROLE_ADMIN config key
that defaults to Admin. you can completely override the default inferred permissions
and reduce the level of granularity, for more detail about this read the Security chapter.
Let’s dive into a simple example using the quickhowto. The quickhowto example has a Contact’s Model and a Group Model, so each Contact belongs to a Group.
First let’s define a CRUD REST Api for our Group model resource:
from flask_appbuilder.models.sqla.interface import SQLAInterface
from flask_appbuilder.api import ModelRestApi
from . import appbuilder


class GroupModelApi(ModelRestApi):
    resource_name = 'group'
    datamodel = SQLAInterface(ContactGroup)

appbuilder.add_api(GroupModelApi)
Behind the scenes FAB uses marshmallow-sqlalchemy to infer the Model to a Marshmallow Schema,
that can be safely serialized and deserialized. Let’s recall our Model definition for ContactGroup:
class ContactGroup(Model):
    id = Column(Integer, primary_key=True)
    name = Column(String(50), unique=True, nullable=False)

    def __repr__(self):
        return self.name
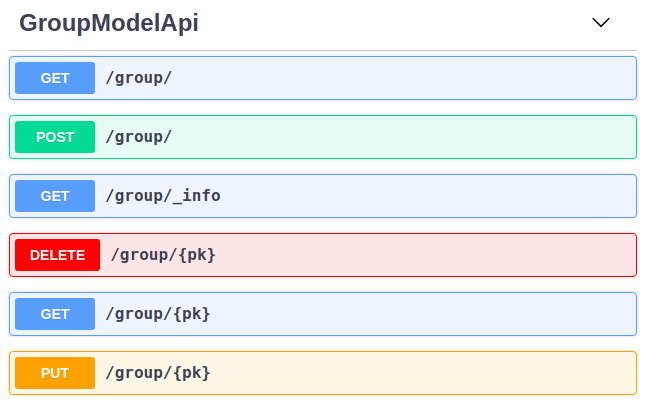
Swagger UI API representation for groups (http://localhost:8080/swagger/v1):
All endpoints are protected so we need to request a JWT and use it on our REST resource, like shown before we need to make a PUT request to the login API endpoint:
# Login to obtain a token
$ curl -XPOST http://localhost:8080/api/v1/security/login -d \
  '{"username": "admin", "password": "password", "provider": "db"}' \
  -H "Content-Type: application/json"
{
    "access_token": "<SOME TOKEN>"
}
# It's nice to use the Token as an env var
$ export TOKEN="<SOME TOKEN>"
First let’s create a Group:
$ curl -XPOST http://localhost:8080/api/v1/group/ -d \
 '{"name": "Friends"}' \
 -H "Content-Type: application/json" \
 -H "Authorization: Bearer $TOKEN"
{
    "id": 1,
    "result": {
        "name": "Friends"
    }
}
We got back a response with the model id and result with the inserted data. Now let’s query our newly created Group:
$ curl http://localhost:8080/api/v1/group/1 \
 -H "Content-Type: application/json" \
 -H "Authorization: Bearer $TOKEN"

{
    "description_columns": {},
    "show_title": "Show Contact Group",
    "show_columns": [
        "name"
    ],
    "label_columns": {
        "name": "Name"
    },
    "id": "1",
    "result": {
       "name": "Friends"
    }
}
As you can see, the API returns the model data, and extra meta data so you can properly render a page with labels, descriptions and defined column order. This way it should be possible to develop a React component (for example) that renders any model just by switching between HTTP endpoints. It’s also possible to just ask for certain meta data keys, we will talk about this later.
Next let’s change our newly created model (HTTP PUT):
$ curl -XPUT http://localhost:8080/api/v1/group/1 -d \
 '{"name": "Friends Changed"}' \
 -H "Content-Type: application/json" \
 -H "Authorization: Bearer $TOKEN"
{
    "result": {
        "name": "Friends Changed"
    }
}
And finally test the delete method (HTTP DELETE):
$ curl -XDELETE http://localhost:8080/api/v1/group/1 \
 -H "Content-Type: application/json" \
 -H "Authorization: Bearer $TOKEN"
{
    "message": "OK"
}
Let’s check if it exists (HTTP GET):
$ curl http://localhost:8080/api/v1/group/1 \
 -H "Content-Type: application/json" \
 -H "Authorization: Bearer $TOKEN"
{
    "message": "Not found"
}
We get an HTTP 404 (Not found).
Information endpoint
This endpoint serves as a method to fetch meta information about our CRUD methods. Again the main purpose to serve meta data is to make possible for a frontend layer to be able to render dynamically:
Search options
Forms
Enable/disable features based on permissions.
First a birds eye view from the output of the _info endpoint:
{
    "add_columns": [...],
    "edit_columns": [...],
    "add_title": "...",
    "edit_title": "...",
    "filters": {...},
    "permissions": [...]
}
Let’s drill down this data structure, add_columns and edit_columns are similar
and serve to aid on rendering forms for add and edit so their response contains the
following data structure:
{
    "add_columns": [
        {
            "description": "<COL_DESCRIPTION>",
            "label": "<COL_LABEL>",
            "name": "<COL_NAME>",
            "required": true|false,
            "unique": true|false,
            "type": "String|Integer|Related|RelatedList|...",
            "validate": [ ... list of validation methods ... ]
            "count": <optional number>
            "values" : [ ... optional with all possible values for a related field ... ]
        },
        ...
    ]
}
Edit fields edit_columns is similar, but it’s content may be different, since
we can configure it in a distinct way
Next, filters, this returns all the necessary info to render all possible filters allowed by the backend database for each field on the model:
{
    "filters": {
        "<COL_NAME>": [
            {
                "name": "<HUMAN READABLE AND I18N>",
                "operator": "<OPERATION_NAME>"
            },
            ...
        ],
        ...
    }
}
Note that the operator value can be used to filter our list queries, more about this later.
Finally the permissions, this declares all allowed permissions for the current user.
Remember that these can extend the automatic HTTP methods generated by ModelRestApi
by just defining new methods and protecting them with the protect decorator:
{
    "permissions": ["can_get", "can_put", ... ]
}
On all GET HTTP methods we can select which meta data keys we want, this can be done using Rison URI arguments. So the _info endpoint is no exception. The across the board way to filter meta data is to send a GET request using the following structure:
{
    "keys": [ ... LIST OF META DATA KEYS ... ]
}
That translates to the following in Rison for fetching just the permissions meta data:
(keys:!(permissions))
So, back to our example:
$ curl 'http://localhost:8080/api/v1/group/_info?q=(keys:!(permissions))' \
-H "Content-Type: application/json" \
-H "Authorization: Bearer $TOKEN"
{
    "permissions": [
        "can_get",
        "can_post",
        "can_put",
        "can_delete"
    ]
}
And to fetch the permissions and Add form fields info:
$ curl 'http://localhost:8080/api/v1/group/_info?q=(keys:!(permissions,add_columns))' \
-H "Content-Type: application/json" \
-H "Authorization: Bearer $TOKEN"
{
    "add_columns": [ ... ],
    "permissions": [
        "can_get",
        "can_post",
        "can_put",
        "can_delete"
    ]
}
To fetch meta data with internationalization use _l_ URI key argument with i18n country code as the value. This will work on any HTTP GET endpoint:
$ curl 'http://localhost:8080/api/v1/group/_info?q=(keys:!(permissions,add_columns))&_l_=pt' \
-H "Content-Type: application/json" \
-H "Authorization: Bearer $TOKEN"
{
    "add_columns": [ ... ],
    "permissions": [
        "can_get",
        "can_post",
        "can_put",
        "can_delete"
    ]
}
Render meta data with Portuguese, labels, description, filters
The add_columns and edit_columns keys also render all possible
values from related fields, using our quickhowto example:
{
    "add_columns": [
        {
            "description": "",
            "label": "Gender",
            "name": "gender",
            "required": false,
            "unique": false,
            "type": "Related",
            "count": 2,
            "values": [
                {
                  "id": 1,
                  "value": "Male"
                },
                {
                  "id": 2,
                  "value": "Female"
                }
            ]
        },
        ...
    ]
}
These related field values can be filtered server side using the add_query_rel_fields
or edit_query_rel_fields:
class ContactModelApi(ModelRestApi):
    resource_name = 'contact'
    datamodel = SQLAInterface(Contact)
    add_query_rel_fields = {
        'gender': [['name', FilterStartsWith, 'F']]
    }
You can also impose an order for these values server side using order_rel_fields:
class ContactModelApi(ModelRestApi):
    resource_name = 'contact'
    datamodel = SQLAInterface(Contact)
    order_rel_fields = {
        'contact_group': ('name', 'asc'),
        'gender': ('name', 'asc')
    }
The previous example will filter out only the Female gender from our list of possible values
Note that these related fields may render a long list of values, so pagination is available and subject to a max page size. You can paginate these values using the following Rison argument structure:
{
    "add_columns": {
        <COL_NAME> : {
            'page': int,
            'page_size': int
        }
    }
}
Using Rison example:
(add_columns:(contact_group:(page:0,page_size:10)))
We can also restrict server side the available fields for add and edit using add_columns
and edit_columns. Additionally you can use add_exclude_columns and edit_exclude_columns:
class ContactModelApi(ModelRestApi):
    resource_name = 'contact'
    datamodel = SQLAInterface(Contact)
    add_columns = ['name']
Will only return the field name from our Contact model information endpoint for add_fields
Get Item
The get item endpoint is very simple, and was already covered to some extent. The response data structure is:
{
    "id": "<Primary Key>"
    "description_columnns": {},
    "label_columns": {},
    "show_columns": [],
    "show_title": "",
    "result": {}
}
Now we are going to cover the Rison arguments for custom fetching meta data keys or columns. This time the accepted arguments are slightly extended:
{
    "keys": [ ... List of meta data keys to return ... ],
    "columns": [ ... List of columns to return ... ]
}
So for fetching only the name and address for a certain Contact, using Rison:
(columns:!(name,address))
Our curl command will look like:
curl 'http://localhost:8080/api/v1/contact/1?q=(columns:!(name,address))' \
-H "Content-Type: application/json" \
-H "Authorization: Bearer $TOKEN"
{
  "description_columns": {},
  "id": "1",
  "show_columns": [
    "name",
    "address"
  ],
  "show_title": "Show Contact",
  "label_columns": {
    "address": "Address",
    "name": "Name"
  },
  "result": {
    "address": "Street phoung",
    "name": "Wilko Kamboh"
  }
}
And to only include the label_columns meta data, Rison data structure:
(columns:!(name,address),keys:!(label_columns))
Our curl command will look like:
curl 'http://localhost:8080/api/v1/contact/1?q=(columns:!(name,address),keys:!(label_columns))' \
-H "Content-Type: application/json" \
-H "Authorization: Bearer $TOKEN"
{
  "id": "1",
  "label_columns": {
    "address": "Address",
    "name": "Name"
  },
  "result": {
    "address": "Street phoung",
    "name": "Wilko Kamboh"
  }
}
To discard completely all meta data use the special key none:
(columns:!(name,address),keys:!(none))
Our curl command will look like:
curl 'http://localhost:8080/api/v1/contact/1?q=(columns:!(name,address),keys:!(none))' \
-H "Content-Type: application/json" \
-H "Authorization: Bearer $TOKEN"
{
  "id": "1",
  "result": {
    "address": "Street phoung",
    "name": "Wilko Kamboh"
  }
}
We can restrict or add fields for the get item endpoint using
the show_columns property. This takes precedence from the Rison arguments:
class ContactModelApi(ModelRestApi):
    resource_name = 'contact'
    datamodel = SQLAInterface(Contact)
    show_columns = ['name']
By default FAB will issue a query containing the exact fields for show_columns, but these are also associated with the response object. Sometimes it’s useful to distinguish between the query select columns and the response itself. Imagine the case you want to use a @property to further transform the output, and that transformation implies two model fields (concat or sum for example):
class ContactModelApi(ModelRestApi):
    resource_name = 'contact'
    datamodel = SQLAInterface(Contact)
    show_columns = ['name', 'age']
    show_select_columns = ['name', 'birthday']
The Model:
class Contact(Model):
    id = Column(Integer, primary_key=True)
    name = Column(String(150), unique=True, nullable=False)
    ...
    birthday = Column(Date, nullable=True)
    ...

    @property
    def age(self):
        return date.today().year - self.birthday.year
Note: The same logic is applied on list_select_columns
We can add fields that are python functions also, for this on the SQLAlchemy definition, let’s add a new function:
class Contact(Model):
    id = Column(Integer, primary_key=True)
    name = Column(String(150), unique=True, nullable=False)
    address = Column(String(564))
    birthday = Column(Date, nullable=True)
    personal_phone = Column(String(20))
    personal_celphone = Column(String(20))
    contact_group_id = Column(Integer, ForeignKey('contact_group.id'), nullable=False)
    contact_group = relationship("ContactGroup")
    gender_id = Column(Integer, ForeignKey('gender.id'), nullable=False)
    gender = relationship("Gender")

    def __repr__(self):
        return self.name

    def some_function(self):
        return f"Hello {self.name}"
And then on the REST API:
class ContactModelApi(ModelRestApi):
    resource_name = 'contact'
    datamodel = SQLAInterface(Contact)
    show_columns = ['name', 'some_function']
The show_columns is also useful to impose an order on the columns.
Again this is useful to develop a dynamic frontend show item page/component
by using the include_columns meta data key.
Note that this can be done on the query list endpoint also using list_columns
Lists and Queries
Finally for our last HTTP endpoint, and the most feature rich. The response data structure is:
{
    "count": <RESULT_COUNT">
    "ids": [ ... List of PK's ordered by result ... ],
    "description_columns": {},
    "label_columns": {},
    "list_columns": [ ... An ordered list of columns ...],
    "order_columns": [ ... List of columns that can be ordered ... ],
    "list_title": "",
    "result": []
}
As before meta data can be chosen using Rison arguments:
(keys:!(label_columns))
Will only fetch the label_columns meta data key
And we can choose which columns to fetch:
(columns:!(name,address))
To reduce or extend the default inferred columns from our Model.
On server side we can use the list_columns property,
this takes precedence over Rison arguments:
class ContactModelApi(ModelRestApi):
    resource_name = 'contact'
    datamodel = SQLAInterface(Contact)
    list_columns = ['name', 'address']
FAB supports dotted notation (one level on GET methods only) so you can control what columns get rendered on related nested columns this applies with order by fields:
class ContactModelApi(ModelRestApi):
    resource_name = 'contact'
    datamodel = SQLAInterface(Contact)
    list_columns = ['name', 'address', 'contact_group.name']
By default related columns on this case contact_group will create a nested
complete sub schema (on our example will return {“contact_group”: {“name”, “id”}}.
For ordering the results, the following will order contacts by name descending Z..A:
(order_column:name,order_direction:desc)
To set a default order server side use base_order tuple:
class ContactModelApi(ModelRestApi):
    resource_name = 'contact'
    datamodel = SQLAInterface(Contact)
    base_order = ('name', 'desc')
Pagination, get the second page using page size of two (just an example):
(page:2,page_size:2)
To set the default page size server side:
class ContactModelApi(ModelRestApi):
    resource_name = 'contact'
    datamodel = SQLAInterface(Contact)
    page_size = 20
And last, but not least, filters. The query filters data structure:
{
    "filters": [
        {
            "col": <COL_NAME>,
            "opr": <Operation type>,
            "value": <VALUE>
        },
        ...
    ]
}
All filters are AND operations. We can filter by several column names using different operations, so using Rison:
(filters:!((col:name,opr:sw,value:a),(col:name,opr:ew,value:z)))
The previous filter will query all contacts whose name starts with “a” and ends with “z”. The possible operations for each field can be obtained from the information endpoint. FAB can filter your models by any field type and all possible operations
Note that all Rison arguments can be used alone or in combination:
(filters:!((col:name,opr:sw,value:a),(col:name,opr:ew,value:z)),columns:!(name),order_columns:name,order_direction:desc)
Will filter all contacts whose name starts with “a” and ends with “z”, using descending name order by, and just fetching the name column.
To impose base filters server side:
class ContactModelApi(ModelRestApi):
    resource_name = 'contact'
    datamodel = SQLAInterface(Contact)
    base_filters = [['name', FilterStartsWith, 'A']]
The filter will act on all HTTP endpoints, protecting delete, create, update and display operations
Simple example using doted notation, FAB will infer the necessary join operation:
class ContactModelApi(ModelRestApi):
    resource_name = 'contact'
    datamodel = SQLAInterface(Contact)
    base_filters = [['contact_group.name', FilterStartsWith, 'F']]
Locks all contacts, to groups whose name starts with “F”. Using the provided test data on the quickhowto example, limits the contacts to family and friends.
Updates and Partial Updates
PUT methods allow for changing a Model. Allowed changes are controlled by
edit_columns:
class ContactModelApi(ModelRestApi):
    resource_name = 'contact'
    datamodel = SQLAInterface(Contact)
    edit_columns = ['name']
First let’s create a new contact:
curl -XPOST 'http://localhost:8080/api/v1/contact/' -H "Authorization: Bearer $TOKEN" -d \
'{"name":"New Contact", "personal_celphone":"1234", "contact_group": 1, "gender":1}' \
-H "Content-Type: application/json"
{
   "id": 4,
   "result": {
       "address": null,
       "birthday": null,
       "contact_group": 1,
       "gender": 1,
       "name": "New Contact",
       "personal_celphone": "1234",
       "personal_phone": null
   }
}
So if you submit a change for personal_celphone:
$ curl -v XPUT http://localhost:8080/api/v1/contact/4 -d \
'{"name": "Change name", "personal_celphone": "this should not change"}' \
-H "Content-Type: application/json" \
-H "Authorization: Bearer $TOKEN"
{
    "result": {
        "name": "Change name"
    }
}
Let’s confirm:
curl -XGET 'http://localhost:8080/api/v1/contact/4' -H "Authorization: Bearer $TOKEN"
{
    ....
    "id": "4",
    "result": {
        "address": null,
        "birthday": null,
        "contact_group": {
            "id": 1,
            "name": "Friends"
        },
        "gender": {
            "id": 1,
            "name": "Male"
        }
        "name": "Change name",
        "personal_celphone": "1234",
        "personal_phone": null
    }
}
The PUT method may also work like a PATCH method, remove the edit_columns from the API class
and test a partial update:
$ curl -v XPUT http://localhost:8080/api/v1/contact/ -d \
'{"personal_celphone": "4321"}' \
-H "Content-Type: application/json" \
-H "Authorization: Bearer $TOKEN"
{
    "result": {
        "address": null,
        "birthday": null,
        "contact_group": 1
        "gender": 1,
        "name": "Change name",
        "personal_celphone": "4321",
        "personal_phone": null
    }
}
Validation and Custom Validation
Notice that by using marshmallow with SQLAlchemy, we are validating field size, type and required fields out of the box. This is done by marshmallow-sqlalchemy that automatically creates ModelSchema’s inferred from our SQLAlchemy Models. But you can always use your own defined Marshmallow schemas independently for add, edit, list and show endpoints.
A validation error for PUT and POST methods returns HTTP 422 and the following JSON data:
{
    "message": {
        "<COL_NAME>": [
            "<ERROR_MESSAGE>",
            ...
        ],
        ...
    }
}
Next we will test some basic validation, first the field type by sending a name that is a number:
$ curl XPOST http://localhost:8080/api/v1/group/ -d \
'{"name": 1234}' \
-H "Content-Type: application/json" \
-H "Authorization: Bearer $TOKEN"
{
  "message": {
    "name": [
      "Not a valid string."
    ]
  }
}
And we get an HTTP 422 (Unprocessable Entity).
How to add custom validation? On our next example we only allow group names that start with a capital “A”:
from flask_appbuilder.api.schemas import BaseModelSchema


def validate_name(n):
    if n[0] != 'A':
        raise ValidationError('Name must start with an A')

class GroupCustomSchema(BaseModelSchema):
    model_cls = ContactGroup
    name = fields.Str(validate=validate_name)
Note that BaseModelSchema extends marshmallow Schema class, to support automatic SQLAlchemy model creation and update, it’s a lighter version of marshmallow-sqlalchemy ModelSchema. Declare your SQLAlchemy model on model_cls so that a model is created on schema load.
Then on our Api class:
class GroupModelRestApi(ModelRestApi):
    resource_name = 'group'
    add_model_schema = GroupCustomSchema()
    edit_model_schema = GroupCustomSchema()
    datamodel = SQLAInterface(ContactGroup)
Let’s try it out:
$ curl -v XPOST http://localhost:8080/api/v1/group/ -d \
'{"name": "BOLA"}' \
-H "Content-Type: application/json" \
-H "Authorization: Bearer $TOKEN"
{
  "message": {
    "name": [
      "Name must start with an A"
    ]
  }
}
Overriding completely the marshmallow Schema gives you complete control
but can become very cumbersome for Models with many attributes, there is
a simpler way of doing this using validators_columns property:
class GroupModelRestApi(ModelRestApi):
    resource_name = 'group'
    datamodel = SQLAInterface(ContactGroup)
    validators_columns = {'name': validate_name}
Many to Many relations
Until now we have only tested one to many relations, let’s see how to handle many to many relationships. First we need to change our models, on this example we are going to add tags to our Contacts:
class Tag(Model):
    id = Column(Integer, primary_key=True)
    name = Column(String(50), unique=True, nullable=False)

    def __repr__(self):
        return self.name


assoc_contact_tag = Table(
    "contact_tags",
    Model.metadata,
    Column("contact_id", Integer, ForeignKey("contact.id"), nullable=True),
    Column("tag_id", Integer, ForeignKey("tag.id"), nullable=True)
)
Then add a new field to the Contact Model:
class Contact(Model):
    id = Column(Integer, primary_key=True)
    ...
    tags = relationship(
        "Tag",
        secondary=assoc_contact_tag,
        backref="contact"
    )
By default M-M fields are not required, very simple REST API’s to Contact and Tag Model would be:
class ContactApi(ModelRestApi):
    datamodel = SQLAInterface(Contact)
    resource_name = 'contact'

appbuilder.add_api(ContactApi)

class TagApi(ModelRestApi):
    datamodel = SQLAInterface(Tag)
    resource_name = 'tag'

appbuilder.add_api(TagApi)
First let create some tags (this example assumes that group and gender already contains data):
$ curl -XPOST http://localhost:8080/api/v1/tag/ -d \
$ '{"name": "T1"}' \
$ -H "Content-Type: application/json" -H "Authorization: Bearer $TOKEN"
{"id":1,"result":{"contact": [], "name":"T1"}}
$ curl -XPOST http://localhost:8080/api/v1/tag/ -d \
$ '{"name": "T2"}' \
$ -H "Content-Type: application/json" -H "Authorization: Bearer $TOKEN"
{"id":2,"result":{"contact": [], "name":"T2"}}
Notice the contact field on the Tag model, this is the backref and is not required by default also. To create a contact with some tags:
$ curl -XPOST http://localhost:8080/api/v1/contact/ -d \
$ '{"name": "C1", "contact_group": 1, "gender": 1, "tags": [1, 2]}' \
$ -H "Content-Type: application/json" -H "Authorization: Bearer $TOKEN"
{"id":1,"result":{"address":null,"birthday":null,"contact_group":1,"gender":1,"name":"C1","personal_celphone":null,"personal_phone":null,"tags":[1,2]}}
You can add a contact without any tags, if you want to enforce tags as a required field use the info dict from SQLAlchemy:
class Contact(Model):
    id = Column(Integer, primary_key=True)
    ...
    tags = relationship(
        "Tag",
        secondary=assoc_contact_tag,
        backref="contact",
        info={"required": True}
    )
Pre and Post processing
ModelRestApi offers several methods that you can override to perform pre processing or post processing
on all HTTP methods. These methods are nice places to change data before submission or retrieval:
- class flask_appbuilder.api.ModelRestApi[source]
- post_add(item: Model) None[source]
Override this, will be called after update
- post_delete(item: Model) None[source]
Override this, will be called after delete
- post_update(item: Model) None[source]
Override this, will be called after update
- pre_add(item: Model) None[source]
Override this, will be called before add.
- pre_delete(item: Model) None[source]
Override this, will be called before delete
- pre_get(data: Dict[str, Any]) None[source]
Override this, will be called before data is sent to the requester on get item endpoint. You can use it to mutate the response sent. Note that any new field added will not be reflected on the OpenApi spec.
- pre_get_list(data: Dict[str, Any]) None[source]
Override this, will be called before data is sent to the requester on get list endpoint. You can use it to mutate the response sent Note that any new field added will not be reflected on the OpenApi spec.
- pre_update(item: Model) None[source]
Override this, this method is called before the update takes place.
Excluding builtin generated routes
There may be the case where you want to leverage some of the auto generated endpoints but want to disable others. For example you may want to just expose the GET endpoints for fetching a single record or records. You can declare which methods don’t get registered on the Flask blueprint for the class (no permissions are created also, since it’s like the methods do not exist):
class ContactApi(ModelRestApi):
    datamodel = SQLAInterface(Contact)
    exclude_route_methods = ("put", "post", "delete", "info")

appbuilder.add_api(ContactApi)
On the previous example only the get and get_list methods are registered
Note that using by normal OOP, you can override any builtin methods or create new ones
Enum Fields
ModelRestApi offers support for Enum fields, you have to declare them
on a specific way:
class BookType(enum.Enum):
    HARDCOVER = 1
    PAPERBACK = 2
    EBOOK = 3


class Book(Model):
    id = Column(Integer, primary_key=True)
    title = Column(String(150), unique=True, nullable=False)
    type = Column(Enum(BookType), nullable=False)
Default marshmallow behaviour for enums is to return the value of the enum, in this case an integer. If you want to return the string representation of the enum you can set this behaviour at the Model definition:
class Book(Model):
    id = Column(Integer, primary_key=True)
    title = Column(String(150), unique=True, nullable=False)
    type = Column(Enum(BookType), nullable=False, info={"marshmallow_enum": {"by_value": False}})